xwillmadeit

  • 首页
  • 归档
  • 标签

nodejs中使用redis

发表于 2016-07-03

最简单的使用

1
2
3
var redis = require('redis');
var config = require('./config/redisConfig');
client = redis.createClient(config.redis.port, config.redis.ip, {});

上面用到的 redisConfig 中的相关配置

  • 本地

    1
    2
    3
    4
    var redis = {
    ip: '127.0.0.1',
    port: '6379'
    };
  • 线上

    1
    2
    3
    4
    5
    var redis = {
    ip: '',
    port: '6379',
    pwd: ''
    };

set,get,expire 都在 client 对象上操作

实战中使用 redis

这里将一些简单常用的操作封装成了 redisHandle.js

1
2
3
4
5
6
7
8
9
10
11
12
13
14
15
16
17
18
19
20
21
22
23
24
25
26
27
28
29
30
31
32
33
34
35
36
37
38
39
40
41
42
function auth(client, pwd) {
client.auth(pwd, () => console.log('通过认证'));
}

function checkOn(client) {
client.on('error', (error) => console.log(error));
}

function getItem(client, key) {
return new Promise((resolve, reject) => {
client.get(key, (err, reply) => {
if (err) {
reject(err);
} else {
resolve(reply);
}
});
});
}

function setItem(client, key, val) {
return new Promise((resolve, reject) => {
client.set(key, val, (err, reply) => {
if (err) {
reject(err);
} else {
resolve(reply);
}
});
});
}

function clearItem(client, key) {
client.expire(key, 1);
}

module.exports = {
auth,
getItem,
setItem,
clearItem
}

css奇技淫巧大搜罗

发表于 2016-06-25

使元素变灰

1
2
3
4
5
filter: grayscale(100%);
-webkit-filter: grayscale(100%);
-moz-filter: grayscale(100%);
-ms-filter: grayscale(100%);
-o-filter: grayscale(100%);

如果想使整个网站变灰,只需在 html 上使用上面的样式即可~

页面顶部阴影

这个小trick真是不错~

1
2
3
4
5
6
7
8
9
10
11
12
13
14
body:before {
content: "";
position: fixed;
top: -10px;
left: 0;
width: 100%;
height: 10px;

-webkit-box-shadow: 0px 0px 10px rgba(0,0,0,.8);
-moz-box-shadow: 0px 0px 10px rgba(0,0,0,.8);
box-shadow: 0px 0px 10px rgba(0,0,0,.8);

z-index: 100;
}

使 footer 粘住底部,无论内容区是否足够高

方法一,使用视口区域减去底部高度:

1
2
3
4
5
6
7
8
9
.content {
min-height: calc(100vh - 50px);
}

.footer {
height: 50px;
width: 100%;
background-color: pink;
}

1
2
3
4
<div class="content">
content
</div>
<footer class="footer"></footer>

方法二,全局增加一个负值下边距等于底部高度

1
2
3
4
5
6
7
8
9
10
11
12
13
14
15
16
17
18
19
html, body {
height: 100%;
margin: 0;
}
.wrapper {
min-height: 100%;

/* Equal to height of footer */
/* But also accounting for potential margin-bottom of last child */
margin-bottom: -50px;
}
.footer,
.push {
height: 50px;
}
.footer {
width: 100%;
background-color: pink;
}

1
2
3
4
5
<div class="wrapper">
content
<div class="push"></div>
</div>
<footer class="footer"></footer>

这两种用的最多

css粘住底部

css 分割线

1
2
3
4
5
6
7
8
9
10
11
12
13
14
15
16
17
18
19
20
21
22
23
<div class="line_03">
<b></b>
<span>小小分隔线 inline-block实现</span>
<b></b>
</div>

.line_03{
width: 600px;
}
.line_03 b{
background: #ddd;
margin-top: 4px;
display: inline-block;
width: 180px;
height: 1px;
vertical-align: middle;
}
.line_03 span{
display: inline-block;
width: 220px;
vertical-align: middle;
text-align: center;
}

移动端适配终极解决方案

发表于 2016-06-24

淘宝使用 rem 适配方案

计算缩放值 initial-scale

1
2
var scale = 1 / window.devicePixelRatio;
document.querySelector('meta[name="viewport"]').setAttribute('content','width=device-width,initial-scale=' + scale + ', maximum-scale=' + scale + ', minimum-scale=' + scale + ', user-scalable=no');

动态生成 html 的 font-size 值,全局使用 rem

1
document.documentElement.style.fontSize = document.documentElement.clientWidth / 10 + 'px';

对于iphone6来说,计算出 font-size 为 75px,所以现在只需要将测量的尺寸数据除以75就转换成了rem单位。

1
2
3
4
5
6
7
8
9
10
11
12
13
14
15
16
17
18
19
20
21
22
23
24
25
26
27
28
<html>
<head>
<title></title>
<meta charset="utf-8" />
<meta name="viewport" content="" />
<style>
body{
margin: 0;
padding: 0;
}
.box{
width: 2.66666667rem; /*设计稿的200px*/
height: 2.66666667rem;
background: red;
}
</style>

</head>
<body>

<div class="box"></div>

<script>
var scale = 1 / window.devicePixelRatio;
document.querySelector('meta[name="viewport"]').setAttribute('content','width=device-width,initial-scale=' + scale + ', maximum-scale=' + scale + ', minimum-scale=' + scale + ', user-scalable=no');
document.documentElement.style.fontSize = document.documentElement.clientWidth / 10 + 'px';
</script>

</body>
</html>

一篇真正教会你开发移动端页面的文章(二)

call,apply,bind再一次整理

发表于 2016-06-24

call,apply,bind 到底是用来干嘛的?

每次看到这几个方法,都不能很快的跳出他们的作用及区别。因为实战中用的太少,不过还是要再次整理一下,以备后用。
1.借用别人的方法

1
2
3
4
5
6
7
8
9
10
11
12
13
14
var Fruits = {
name: 'Fruits',
say: function(){
console.log('im ' + this.name);
}
}

var Apple = {
name: 'apple'
}

Fruits.say();
Fruits.say.call(Apple);
Fruits.say.apply(Apple);

2.数组之间追加

1
2
3
4
var array1 = [12 , "foo" , {name: "Joe"} , -2458]; 
var array2 = ["Doe" , 555 , 100];
Array.prototype.push.apply(array1, array2);
console.log(array1);

3.代理方法
比如写一个 log 函数,用于实现 console.log

1
2
3
4
5
6
function log(){
//注意 arguments 不是数组!直接 console.log(arguments) 无效
console.log.apply(console, arguments);
}

log(1);

如果想在每个 console.log 前加个前缀

1
2
3
4
5
6
7
8
function log(){
var args = Array.prototype.slice.call(arguments); //转为标准数组
args.unshift('(app)');

console.log.apply(console, args);
}

log(1);

call 和 apply 有什么区别?

其实功能一样,只是 apply 的第二个参数接受数组,不需要知道传入的个数,包装成数组即可

1
2
3
4
5
6
var func = function(arg1, arg2) {

};

func.call(this, arg1, arg2);
func.apply(this, [arg1, arg2]);

bind 有什么用?

首先 bind 是什么?MDN的解释是:bind()方法会创建一个新函数,称为绑定函数,当调用这个绑定函数时,绑定函数会以创建它时传入 bind()方法的第一个参数作为 this,传入 bind() 方法的第二个以及以后的参数加上绑定函数运行时本身的参数按照顺序作为原函数的参数来调用原函数。

挖槽这怎么看的懂???上代码

1
2
3
4
5
6
7
8
9
var foo = {
bar : 1,
eventBind: function(){
var _this = this;
$('.someClass').on('click',function(event) {
console.log(_this.bar);
});
}
}

以上代码很容易理解,this 发生了变化,所以必须将 this 赋予 _this

使用 bind 改造这段代码

1
2
3
4
5
6
7
8
var foo = {
bar : 1,
eventBind: function(){
$('.someClass').on('click',function(event) {
console.log(this.bar);
}, bind(this));
}
}

在上述代码里,bind() 创建了一个函数,当这个click事件绑定在被调用的时候,它的 this 关键词会被设置成被传入的值(这里指调用bind()时传入的参数)。因此,这里我们传入想要的上下文 this(其实就是 foo ),到 bind() 函数中。然后,当回调函数被执行的时候, this 便指向 foo 对象。

bind call apply 区别

1
2
3
4
5
6
7
8
9
10
11
12
13
var bar = function(){
console.log(this.x);
}

var foo = {
x: 5
}

bar.bind(foo)();

bar.apply(foo);

bar.call(foo);

其实 call,apply,bind 的作用都是改变 this 的指向,只是 bind 需要调用执行,apply 和 call 会立即执行。

css布局技巧

发表于 2016-06-23

主流处理等分布局

参考各大网站发现都使用到了给 ul 设置负的 margin 值

  1. 首先将宽度除以份数,如 1200/5 则每个格子 240px;
  2. 给每份增加 margin-left 如 20px,则每个格子 width 减少 20px 变为 220px
  3. 第一个元素不需要 margin-left ,所以使用对 ul 使用 margin-left: -20px,则盒子总宽度1220px
  4. 1220/5 则每个格子占 244px,所以每个格子的 width 为 224px

双飞翼布局

关于什么是双飞翼布局,网上一大堆介绍…主要实现的是左右固定而中间区域自适应…废话不说,上代码

1
2
3
4
5
6
7
<div class = "container">
<div class="center col">
<div class="main">这是一行字</div>
</div>
<div class="left col">这是一行字</div>
<div class="right col">这是一行字</div>
</div>
1
2
3
4
5
6
7
8
9
10
11
12
13
14
15
16
17
18
19
20
21
22
23
24
25
26
27
28
29
30
31
32
33
34
35
36
*{
margin: 0;
padding: 0;
}
body{
color: red;
font-weight: bold;
}
.container{
width: 100%;
}
.col{
float: left;
}
.center{
width: 100%;
min-height: 500px;
background: pink;
}
.main{
margin-left: 300px;
margin-right: 200px;
min-height: 500px;
}
.left{
margin-left: -100%;
width: 300px;
min-height: 500px;
background: blue;
}
.right{
margin-left: -200px;
min-height: 500px;
width: 200px;
background: yellow;
}

注意两点:
1.center 为什么写在最前面,因为可以起到中间内容区优先加载的作用。
2.为什么要在 center 中套一个 main?因为 left 把 center 的内容遮挡了,需要 margin-left 一个 left 的宽度,同理,right 也是

双飞翼布局是个啥

nodejs中使用mysql连接池

发表于 2016-06-23

使用连接池

1
2
3
4
5
6
7
8
9
10
11
12
13
14
15
16
17
18
19
20
21
var mysql = require('mysql');
var pool = mysql.createPool({
host: '192.168.20.6',
user: 'root',
password: '123321',
database: 'magic'
});
pool.getConnection(function(err, connection){
if (err) {
console.log(err);
}
connection.query(sql, function(qerr, result){
if (qerr) {
console.log(qerr);
} else {
console.log(result);
}
//释放连接
connection.release();
});
});

实战中使用 node-mysql

这里将查询 sql 返回结果封装成了 sqlHandle.js

1
2
3
4
5
6
7
8
9
10
11
12
13
14
15
16
17
18
19
20
21
22
23
function getResult(pool,sql){
return new Promise((resolve,reject) => {
pool.getConnection((err,connection) => {
if(err){
reject(err);
}

connection.query(sql, (qerr, result) => {
if (qerr) {
reject(qerr);
} else {
resolve({result: result});
}
//释放连接
connection.release();
});
});
});
}

module.exports = {
getResult
}

使用连接池

关于时间管理

发表于 2016-06-22

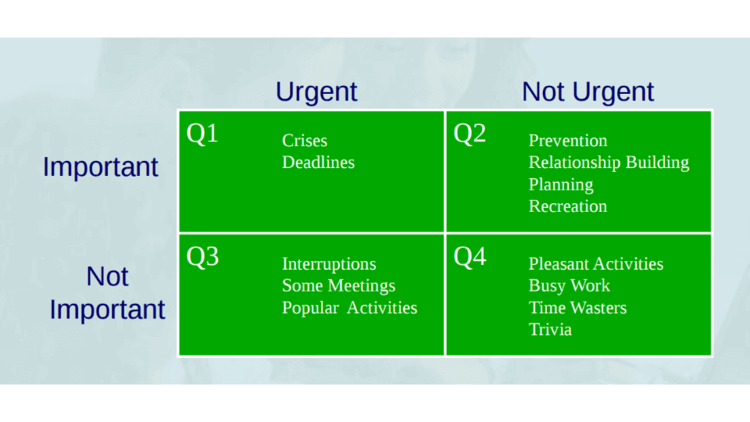
关于时间管理的几句话

在阮一峰老师的博客里看到的关于时间管理的几句话,比较有感触,所以小整理一下。

  1. 进程切换非常昂贵,避免多任务,保持单进程。

  2. 集中注意力、高效工作,每天最多4小时。

  3. 划分任务的优先级,不要把“急切”当作“重要”。

  4. 避免开会,至少不要参加与你无关的会。站着开会,也许是一个缩短会议时间的好办法。

  5. 你没空时不会做的事情,有空了也不会做。
    世上并没有拖延症,只是不想做而已。如果可能,应该尽早放弃你没有意愿去做的那些事。而那些没有时间也会去做的事,才是你应该全力以赴的人生方向。

时间管理的7句话

纯js倒计时

发表于 2016-06-22

javascript 倒计时

最近项目中需要写个倒计时,就整理下…

1
2
3
4
5
6
7
8
9
10
11
12
13
14
15
16
17
18
19
20
21
22
23
24
25
26
27
28
29
30
31
32
33
34
35
36
37
38
39
40
41
42
43
44
45
46
47
48
var countDown = function(targetTime, callback) {

var _second = 1000,
_minute = _second * 60,
_hour = _minute * 60,
_day = _hour * 24,
timer;

function addZero(num) {
if (num < 10) {
return '0' + num;
}
return num;
}

function start() {
var endTime = new Date(targetTime).getTime(),
nowTime = new Date().getTime(),
timeDiff = endTime - nowTime,
data;

if (timeDiff <= 0) {
clearInterval(timer);
if (typeof callback === 'function') {
callback();
}
} else {
if (!timer) {
timer = setInterval(start, 1000);
}
}

data = {
'days': Math.floor(timeDiff / _day),
'hours': addZero(Math.floor((timeDiff % _day) / _hour)),
'minutes': addZero(Math.floor((timeDiff % _hour) / _minute)),
'seconds': addZero(Math.floor((timeDiff % _minute) / _second))
}

console.log('hours:' + data.hours + ',minutes:' + data.minutes + ',seconds:' + data.seconds);
}

start();
};

countDown('2016-06-12 14:58:00', function() {
console.log('do something');
});

注意坑!ios系统中,new Date(‘2016-06-12 12:23:34’).getTime() 为 NaN
简单的解决方法,写个替换函数,格式为 2016/06/12 12:23:34 即可

1
2
3
function parseTime(strDate) {
return new Date(strDate.replace(/-/g, '/')).getTime();
}

angular指令高级

发表于 2016-06-22

scope 作用域

1
<h1 click-me>{{name}}</h1>
1
2
3
4
5
6
7
8
9
10
11
12
13
14
15
16
17
<script>
var app = angular.module('myapp',[]);
app.controller('firstCtrl',['$scope', function($scope){
$scope.name = 'xwill';
}]);
app.directive('clickMe', [function(){
return {
restrict: 'A',
scope: {}, //清空controller中scope值,默认是继承的
link: function(scope, elem, attr){
elem.bind('click', function(){
console.log(scope.name); //undefined,scope值被清空
});
}
}
}]);
</script>

使用 scope: {} 即给指令创建自己的作用域

1
2
3
4
5
6
7
8
9
10
11
12
13
14
app.directive('clickMe',[function(){
return {
restrict: 'A',
controller: 'secondCtrl',
link: function(scope,elem,attr){
elem.bind('click',function(){
console.log(scope.name);
});
}
}
}]);
app.controller('secondCtrl',['$scope',function($scope){
$scope.name = 'xwill2'; //将会覆盖 firstCtrl 中 scope 的值
}]);

使用 controller 属性可改变 scope 指向

scope 通讯,directive 中的 model 改变,controller 中的 model 跟着变

1
2
3
4
<div ng-controller="TestCtrl">
{{name}}
<hello ng-model="name"></hello>
</div>
1
2
3
4
5
6
7
8
9
10
11
12
13
14
15
16
17
18
app.controller('TestCtrl', ['$scope', function($scope) {
$scope.name = 'test';
}]);
app.directive('hello', ['$timeout', function ($timeout) {
return {
restrict: 'EA',
scope: {
myName: '=ngModel'
},
link: function (scope, iElement, iAttrs) {
setTimeout(function(){
scope.$apply(function(){
scope.myName = 'it changes';
});
},1000);
}
};
}]);

&、=、@ 的区别

1
2
3
4
<div ng-controller="TestCtrl">
<div free person="calo" crime="gambel" shout="say('no!')"></div>
<div free person="corleone" crime="killing" shout="say('nonono!')"></div>
</div>
1
2
3
4
5
6
7
8
9
10
11
12
13
14
15
16
17
18
19
20
21
22
23
24
25
26
<script type="text/javascript">
app.controller('TestCtrl', ['$scope', function($scope) {
$scope.calo = {name: 'calo', age: 22};
$scope.corleone = {name: 'corleone', age: 34};

$scope.say = function(word){
alert(word);
}
}])
app.directive('free', [function() {
return {
restrict: 'A',
template: '<div>hello {{myPerson.name}},{{myPerson.age}},your crime is {{myCrime}}</div>',
scope: {
myPerson: '=person', //=绑定 controller 中 scope 的值
myCrime: '@crime', //@取字符串
shout: '&' //绑定方法
},
link: function(scope, iElement, iAttrs) {
iElement.bind('click',function(){
scope.shout();
});
}
};
}]);
</script>

= 用于绑定 controller 中的变量,
@ 获取属性的字面量值
& 绑定 function

require 属性

简单的理解,require 用于请求另外的 controller,传入当前 directive 的 linking function 中
简单例子:
html

1
2
3
4
5
<div ng-controller="TestCtrl">
<div add ng-model="num"></div>
<p>{{num}}</p>
<button ng-click="get()">get</button>
</div>

controller

1
2
3
4
5
6
app.controller('TestCtrl', ['$scope', function($scope) {
$scope.num = 1;
$scope.get = function() {
alert($scope.num);
}
}])

directive

1
2
3
4
5
6
7
8
9
10
11
12
app.directive('add', [function() {
return {
restrict: 'A',
require: 'ngModel',
template: '<button>add</button>',
link: function(scope, iElement, iAttrs, ngModelCtrl) {
iElement.bind('click', function() {
ngModelCtrl.$setViewValue(2);
});
}
};
}]);

ngModel前可以使用 ?^ 两个前缀
? - 不要抛出异常。这使这个依赖变为一个可选项
^ - 允许查找父元素的controller

ngModelCtrl.$setViewValue 可改变 controller 中 ng-model 的值

自定义表单验证 $setValidity

1
2
3
.has-error{
border: 1px solid red;
}
1
2
3
4
5
6
7
<div ng-controller="TestCtrl">
<form name="form" novalidate>
<input type="text" ng-model="user.name" name="username" custom-rule ng-class="{'has-error': form.username.$invalid}">
<input type="text" ng-model="user.phone">
<button ng-click="save()">save</button>
</form>
</div>
1
2
3
4
5
6
7
8
9
10
11
12
13
14
15
16
17
18
19
20
21
22
23
24
25
26
27
28
app.controller('TestCtrl', ['$scope', function($scope) {
$scope.user = {};
$scope.save = function(){
var form = $scope.form;
if(form.username.$invalid){
alert('username不可用');
return false;
}else{
alert('username可用');
}
}
}]);

app.directive('customRule', [function () {
return {
restrict: 'A',
require: 'ngModel',
link: function (scope, iElement, iAttrs, ngModelCtrl) {
iElement.bind('blur',function(){
if(ngModelCtrl.$modelValue != 'xwill'){
ngModelCtrl.$setValidity("customRule", false);
}else{
ngModelCtrl.$setValidity("customRule", true);
}
});
}
};
}]);

首先需要将默认的表单验证禁止 novalidate,设置 form 的 name 字段能让 controller 中通过 $scope.form 取到表单
在 username 字段中自定义验证规则 custom-rule,然后在 customRule 指令中规定只有输入为 xwill 时,表单才可用
在 controller 中可以使用 form.$invalid 判断表单是否可用,form.username.$invalid 判断某字段是否可用

$formatters 和 $parses

1
2
3
4
5
<div ng-controller="TestCtrl">
<input text-transform="uppercase" ng-model="text">
<p>{{text}}</p>
<button ng-click="change()">change</button>
</div>
1
2
3
4
5
6
7
8
9
10
11
12
13
14
15
16
17
18
19
20
21
22
23
24
25
26
27
28
29
30
31
32
33
34
35
36
37
app.controller('TestCtrl', ['$scope', function($scope) {}]);
app.directive('textTransform', function() {
var transformConfig = {
uppercase: function(input) {
return input.toUpperCase();
},
capitalize: function(input) {
return input.replace(
/([a-zA-Z])([a-zA-Z]*)/gi,
function(matched, $1, $2) {
return $1.toUpperCase() + $2;
});
},
lowercase: function(input) {
return input.toLowerCase();
}
};
return {
require: 'ngModel',
link: function(scope, element, iAttrs, modelCtrl) {
var transform = transformConfig[iAttrs.textTransform];
if (transform) {
// $formatters 只改变 view 中的值
// modelCtrl.$formatters.push(function(input) {
// return transform(input || "");
// });

// $parsers 会改变 controller 中 ng-model 的值
modelCtrl.$parsers.push(function(input) {
return transform(input || "");
});

element.css("text-transform", iAttrs.textTransform);
}
}
};
});

这两个方法常用于输入小写,强制转为大写;输入负数转为0,等等~
$formatters 和 $parses 的区别

ionic完整环境搭建

发表于 2016-03-05

安装 JDK (java)

下载 jdk 并安装。比如安装在 C:\Program Files\Java\jdk1.7.0_67 目录
安装完后执行 java -version,如出现 jdk 版本号,说明 jdk 安装成功

系统变量中增加 JAVA_HOME
C:\Program Files\Java\jdk1.7.0_67

修改系统变量PATH,在最前面加上
%JAVA_HOME%\bin;%JAVA_HOME%\jre\bin;

重启命令行 执行 JAVAC,如出现 java 帮助文档,则说明环境变量配置成功。

配置 android 环境 & ant 环境

解压 adt-bundle-windows-x86_64-20140702.zip 至D盘
D:\adt-bundle-windows-x86_64-20140702

修改系统变量PATH,在最前面加上
D:\adt-bundle-windows-x86_64-20140702\eclipse\plugins\org.apache.ant_1.8.3.v201301120609\bin;D:\adt-bundle-windows-x86_64-20140702\sdk\tools;D:\adt-bundle-windows-x86_64-20140702\sdk\platform-tools;

PATH 参考:
D:\adt-bundle-windows-x86_64-20140702\eclipse\plugins\org.apache.ant_1.8.3.v201301120609\bin;D:\adt-bundle-windows-x86_64-20140702\sdk\tools;D:\adt-bundle-windows-x86_64-20140702\sdk\platform-tools;%JAVA_HOME%\bin;%JAVA_HOME%\jre\bin;

cordova 环境配置

1)首先安装 node.js (64位)
下载地址:https://nodejs.org/download/release/v0.12.8/x64/
下载 node-v0.12.8-x64.msi 并安装

安装完后执行
node -v
npm -v
查看 node 和 npm 是否安装,安装成功会先显示版本号

2)安装 cordova
npm install -g cordova
安装完后 执行 cordova -v 查看是否安装成功

注意,无需安装 phonegap

3)安装 ionic
npm install -g ionic
执行 ionic -v 查看 ionic 是否安装成功

1…345
xwillmadeit

xwillmadeit

44 日志
48 标签
© 2017 xwillmadeit
由 Hexo 强力驱动
主题 - NexT.Muse