xwillmadeit

  • 首页
  • 归档
  • 标签

聊聊 Promise

发表于 2017-01-30

定义

Promise 是一个对象,用于提供一个未来值,这个值可能是成功值,也可能是失败值。

A promise is an object that may produce a single value some time in the future: either a resolved value, or a reason that it’s not resolved.

三种状态

Pending
initial state, not fulfilled or rejected.
pending 状态就相当于 http 请求正在等待服务器返回结果一样,可能是等待成功,也可能是失败

Fulfilled
the operation completed successfully.
Fulfilled 状态表示 promise 返回了一个成功值,即 resolve 值

Rejected
the operation failed.
Rejected 状态表示 promise 返回了一个失败值,即 reject 值

简单实例

1
2
3
4
5
6
7
8
9
10
11
12
13
14
15
16
17
18
const say = new Promise((resolve, reject) => {
setTimeout(() => {
if (true) {
resolve('yes');
} else {
reject('no');
}
}, 2000);
});

console.log('begin');

say.then(
res => console.log(res),
err => console.log(err)
);

console.log('end');

嵌套 (Chaining)

1
2
3
4
5
6
7
8
9
10
11
12
13
14
15
16
17
18
19
20
21
22
23
24
25
26
const greet = new Promise((resolve, reject) => {
setTimeout(() => {
if (true) {
resolve('hello');
} else {
reject('no welcome');
}
}, 2000);
});

const toSb = greet => {
return new Promise((resolve, reject) => {
setTimeout(() => {
resolve(`${greet} to sb`);
}, 1000);
});
}

greet.then(
greet => toSb(greet)
).then(
res => console.log(res)
)
.catch(
err => console.log(err)
);

Something Important

错误处理在 promise 中有两种

  1. Promise.prototype.catch(onRejected)
  2. Promise.prototype.then(onFulfilled, onRejected)

因为 .then() 总是返回一个 new promise,所以如果在 then 中处理 onRejected,那么在 promise 嵌套时,第二个 .then() 中的代码总会被执行,在这个例子中就会输出 undefined

1
2
3
4
5
6
7
8
9
greet.then(
greet => toSb(greet),
greetErr => console.log(greetTxt) //if promise is rejected
).then(
res => console.log(res) // here will always print undefined
)
.catch(
err => console.log(err)
);

个人推荐使用 .catch() 处理 onRejected

多个 Promise

1
2
3
4
5
6
7
8
9
10
11
12
13
14
15
16
17
18
19
20
21
22
23
24
25
const p1 = new Promise((resolve, reject) => { 
setTimeout(
() => resolve(1000),
1000
);
});
const p2 = new Promise((resolve, reject) => {
setTimeout(
() => reject(2000),
2000
);
});
const p3 = new Promise((resolve, reject) => {
setTimeout(
() => resolve(3000),
3000
);
});

// 2s to reject the promise
Promise.all([p1, p2, p3]).then(values => {
console.log(values);
}).catch(reason => {
console.log(reason)
});

所有的 promise 成功 resolve 后,则 Promise.all 也成功 resolve
只要有一个 promise 被 reject,则 Promise.all 返回的新 promise 也被 reject
Promise.all reject 的值为第一个被 reject 的 promise 的值

结合 async & await (example)

1
2
3
4
5
6
7
8
9
10
11
12
13
14
15
16
17
18
19
20
21
22
23
24
25
26
27
28
29
30
31
const p1 = new Promise((resolve, reject) => { 
setTimeout(
() => resolve(1000),
1000
);
});

const p2 = new Promise((resolve, reject) => {
setTimeout(
() => resolve(2000),
2000
);
});

const p3 = new Promise((resolve, reject) => {
setTimeout(
() => reject(3000),
3000
);
});

async function allPromise() {
const result = await Promise.all([p1, p2, p3]);
return result;
}

allPromise().then(
res => console.log(res)
).catch(
err => console.log(err) //3000
)

掌握Promise

Git Ninja

发表于 2016-12-26

版本管理的发展史

Local Version Control Systems

To collaborate with developers on other systems,Centralized Version Control Systems (CVCSs) were developed.

Centralized Version Control Systems

其中就有大名鼎鼎的 SVN (Subversion),这种中央版本管理系统的特点:
have a single server that contains all the versioned files, and a number of clients that check out files from that central place.

这种标准被沿用多年,不过其缺点也很明显:
If that server goes down for an hour, then during that hour nobody can collaborate at all or save versioned changes to anything they’re working on. If the hard disk the central database is on becomes corrupted, and proper backups haven’t been kept, you lose absolutely everything.

当你的整个文件修改历史被保存在一个地方时,就有失去所有的风险

Distributed Version Control Systems

从上图很明显的看出,每个客户端都保有一个项目的所有版本修改历史
if any server dies, any of the client repositories can be copied back up to the server to restore it. Every clone is really a full backup of all the data.

Git 中的文件状态

要理解 git,必须理解 git 中文件的三种状态

Modified
Staged
Committed

Modified 对应文件所处区域 Working directory
Staged 对应文件所处区域 Staging area
Committed 对应文件所处区域 Git directory

The basic Git workflow goes something like this:

  • You modify files in your working directory.
  • You stage the files, adding snapshots of them to your staging area.
  • You do a commit, which takes the files as they are in the staging area and stores that snapshot permanently to your Git directory.

Git 配置

1
2
git config --global user.name "John Doe"
git config --global user.email johndoe@example.com

安装完 git 后,第一件事情就是设置全局 Identity:
The first thing you should do when you install Git is to set your user name and email address. This is important because every Git commit uses this information, and it’s immutably baked into the commits you start creating.

这是全局的,如果想针对某个项目设置

1
2
git config user.name "John Doe"
git config user.email johndoe@example.com

查看设置

1
git config --list

Git 常用命令整理

首先看一副图,基本上所有常用命令都可以用这张图上的某个过程描述

Two main approaches to get a git project

Initializing a Repository in an Existing Directory

1
2
3
git init
git add file<>
git commit -m "initial commit"

Cloning an Existing Repository

1
git clone https://github.com/xwillmadeit/webpack2.git [projectName](optional)

Add file to the staged area

1
2
git add .
git add <file>

Commit all staged files

1
2
git commit -m "initial commit"
git commit -a -m "skip git add"

Check status

1
2
git status
git status -s

Check the changes

1
2
3
git diff  (compare with unstaged status with staged or last commit status)
git diff --staged (compare with staged status and last commit status)
git difftool

Undoing things

  1. 当想要修改上次提交文件或提交信息时,可以使用该命令
1
git commit --amend

You end up with a single commit – the second commit replaces the results of the first.

  1. Unstage a file
1
git reset HEAD <file>
  1. Unmodifying a Modified File
1
git checkout -- <file>

this command will revert it back to what it looked like when you last committed.

Branch

list all branches

1
git branch

create a new branch

1
git branch test

switch to another branch

1
git checkout test

create and switch

1
git checkout -b iss53

show log

1
2
3
4
git log
git log <file>
git log -p <file>
git show <commit>

Stash changes before switching branch

1
2
3
git stash
git checkcout test
git stash pop/apply

到这里就整理这么多,都是根据 git book 官方原版书总结出来的,有机会再进阶一下

ES6 Destructuring

发表于 2016-11-22

Destructuring

1
2
3
4
5
6
7
8
9
const person = {
first: 'Wes',
last: 'Bos',
country: 'Canada',
city: 'Hamilton',
twitter: '@wesbos'
};
const first = person.first;
const last = person.last;

缺点,需重新定义两个变量,然后得重复好多代码,总之麻烦

使用 Destructuring

1
2
3
4
5
6
7
8
9
10
11
12
var person = {
name: 'xwill',
age: 24
}

var { name, age } = person;
console.log(name); //xwill
console.log(age); //24

//也可以重命名变量
var { name: myName } = person;
console.log(myName); //xwill

更复杂的结构

1
2
3
4
5
6
7
8
9
10
11
12
13
const wes = {
first: 'Wes',
last: 'Bos',
links: {
social: {
twitter: 'https://twitter.com/wesbos',
facebook: 'https://facebook.com/wesbos.developer',
},
web: {
blog: 'https://wesbos.com'
}
}
};

如果想拿出 twitter 和 facebook

1
2
3
const twitter = wes.links.social.twitter;
const facebook = wes.links.social.facebook;
// Annoying!

使用 Destructuring

1
2
const { twitter, facebook } = wes.links.social;
console.log(twitter, facebook); // logs the 2 variables

Destructuring 设置默认值

1
2
3
4
5
const obj = {
name: 'xwill',
age: 24
}
const { name, age, height = 175 } = obj;

注意,这里 height 并不能在 obj 的属性中,所以,当 Destructuring 一个不存在的属性,如果设置了默认值,则相当于定义了一个新的变量,并赋予默认值。

1
2
3
4
5
const person = {
name: 'xwill',
age: 24
}
const { name, age = 20, height: myHeight = 175 } = person;

分析:

  • First we create a new const var called myHeight.
  • Next we look for person.height. If there was a person.height property, it would be put into the myHeight varaible.
  • There isn’t a height property on our person object, so we fall back to the default of 175.

注意,这里 age 的默认赋值无效。只要 obj 有某属性属性,destructuring 时无论是 undefined,null,0,false,赋值都无效。只有属性不存在的情况下,赋值才有效。

what i've learned today in 2016

发表于 2016-11-22

使用同一个 tab 页同时调试前端 js 和 node

之前 Paul Irish 提到了使用 chrome 调试 nodejs,当时需要单独开一个 tab,现在这个功能被升级为同一个 tab 可同时调试前后端 js。

What you need:

  • Node.js 6.3+ (最好使用 6.6+), “in 6.4 there are a few flaky bugs”

  • Chrome 55+

Enable a new way of Node.js debugging in Chrome

  • Open the chrome://flags/#enable-devtools-experiments URL
  • Enable the Developer Tools experiments flag
  • Relaunch Chrome
  • Open DevTools Setting -> Experiments tab (it started being visible after the reload)
  • Press “SHIFT” 6 times (enjoy it ¯ \ (ツ) / ¯) to show the hidden experiments
  • Check the “Node debugging” checkbox
  • Open/close DevTools

清除 event listener

注意添加事件时不要直接传入匿名回调函数

1
2
3
4
//bad
element.addEventListener("click", function() {

});

Use a reference:

1
2
3
4
5
6
const handler = function () {
console.log("Tada!")
}
element.addEventListener("click", handler)
// Later on
element.removeEventListener("click", handler)

or

1
2
3
4
5
element.addEventListener('click', function click(e) {
if (someCondition) {
return e.currentTarget.removeEventListener('click', click);
}
});

事件可在 devTools 中查看

airbnb 的 css,sass 规范中的一些重点

  1. 为了避免 css 选择器和 js 选择器的一些误解,js 用的选择器最好加上 js- 前缀
    https://github.com/airbnb/css#javascript-hooks

  2. Do not nest selectors more than three levels deep!

1
2
3
4
5
6
7
.page-container {
.content {
.profile {
// STOP!
}
}
}
  • Strongly coupled to the HTML (fragile) —OR—
  • Overly specific (powerful) —OR—
  • Not reusable

Using Object.assign to set inline styles

1
2
3
4
5
6
7
8
9
<script type="text/javascript">
var styles = {
width: '200px',
height: '200px',
backgroundColor: 'salmon'
}
var elem = document.querySelector('.box');
Object.assign(elem.style, styles);
</script>

This pattern seems neat.

Mozilla is working on a new UI for input type “time”

you can test it in Firefox Nightly by enabling dom.forms.datetime in about:config

两个 Elements Panel 中的小技巧

  • Elements panel 中的元素可以拖拽
  • 获取元素在 dom 结构中的选择器结构
    Elements 中选中元素,Right click > copy > copy selector.

Get an overview of all CSS selectors or all JavaScript functions with searching abilities

1
cmd + shift + o

For CSS, you get an overview of all selectors and can filter to a selector of interest.
For JavaScript, you can see all functions, but also, their signatures.

利用 Chrome Experiments 查看修改过的 css

开启:
chrome://flags/#enable-devtools-experiments
http://islegend.com/development/how-to-enable-devtools-experiments-within-google-chrome/

really cool shit!!!

css 覆盖率

开启

然后在 timeline 中 record,停止以后回到 source panel,多余的会红色标注。

devTool 修改直接保存到源文件

开启 Persistence 2.0,把开发目录拖入 devTools,然后匹配的文件会有绿勾出现

修改后发现源码也被修改。

纯 css 爆酷炫图片滤镜效果

http://bennettfeely.com/image-effects/

JSON-Splora

JSON-Splora is a GUI for editing, visualizing, and manipulating JSON data with jq or JavaScript.

安装

1
npm install -g JSON-Splora

打开

1
jsplora

使用

1
2
3
4
5
6
7
keys //输出所有 key

.data //输出 data 节点

.data.filter(d => d.id > 5) //输出 data 数组中 id > 5 的元素

.data.map(d => d.price_key) //输出所有 data 数组中的 price_key 值

学习前端时学到的单词

发表于 2016-10-28

学习前端时学到的单词

concise
adj. 简约; 简明的,简洁的; 精炼;
[例句] Burton’s text is concise and informative.
伯顿的文章语言简洁,信息丰富。

diagnose
vt. 诊断; 判断;
[例句] It could cause bugs that are difficult to diagnose.

revise
vt. 修订; 修正; 改变;
[例句] Revise the constructor to capture the ElementRef.nativeElement in this variable.

consists
v. 包括; 由…组成( consist的第三人称单数 );
[例句] The framework consists of several libraries.

interactions
n. 互动; 一起活动( interaction的名词复数 );
[例句] Angular takes over, presenting your application content in a browser and responding to user interactions according to the instructions you’ve provided.

cohesive
adj. 有黏着力的; 紧密结合的;
[例句] Most apps have many more feature modules, each a cohesive block of code dedicated to an application domain.

complementary
adj. 互补的; 补充的,补足的;
[例句] These are two different and complementary module systems. Use them both to write your apps.

tedious
adj. 冗长乏味的; 单调沉闷的; 令人生厌的;
[例句] Writing such push/pull logic by hand is tedious

nontrivial
adj. 非平凡的;
[例句] It delegates everything nontrivial to services.

precisely
adv. 精确地; 恰好地; 严谨地,严格地; 一丝不苟地;
[例句] More precisely, the redisplay occurs after some kind of asynchronous event related to the view, such as a keystroke, a timer completion, or a response to an HTTP request.

intriguing
adj. 有趣的; 迷人的;
[例句] That template reference variable is intriguing.

fair game
n. 准许捕猎的猎物,可攻击的对象;
[例句] Pretty much everything else is fair game.

provisional
adj. 暂定的; 暂时的,临时的;
n. 临时性; 临时人员;
[例句] Content is provisional and may change.

arbitrary
adj. 乱; 随意的,任性的,随心所欲的; 主观的,武断的; 霸道的,专制的,专横的,独断独行的;
[例句] The data property in the third route is a place to store arbitrary data associated with each specific route.

wildcard
n. 通配符;
[例句] The wildcard route is listed last as it’s the most generic route and should be matched only if no other routes are matched first.

gloss over
粉饰; 掩饰(错误); 把…搪塞过去;
例句] We gloss over everything in between.

ongoing
adj. 不间断的,进行的; 前进的;
[例句] There is an ongoing debate on the issue.

skeleton
n. 骨骼; (建筑物等的) 骨架; 梗概; 骨瘦如柴的人(或动物);
adj. 骨骼的; 骨瘦如柴的; 概略的; 基本的;
[例句] Use the application generator tool, express-generator, to quickly create an application skeleton.

The Final Closure

发表于 2016-10-17

什么是闭包

闭包是指有权访问另一个函数作用域中的变量的函数。嗯,闭包是个函数,能够访问另外函数中的变量,就这么简单。

闭包和作用域

1
2
3
4
5
6
7
8
function say(name) {
return function() {
return name
}
}

var a = say('hello')
console.log(a())

为什么当内部匿名函数被返回后,而且在其他地方被调用,仍能访问变量 name 呢?这里得从作用域链说起。

当某个函数第一次被调用时,会创建一个执行环境及相应的作用域链,并把作用域链赋值给一个特殊的内部属性([[scope]]),然后使用 this,arguments 和其他命名参数来初始化函数的活动对象。

每个执行环境都有一个表示变量的对象——变量对象。全局环境的变量对象始终存在。而像 say() 函数这样的局部环境的变量对象,则只在函数的执行过程中存在。在创建 say() 时,会创建一个预先包含全局变量对象的作用域链,这个作用域链被保存在内部的[[scope]]属性中。当调用 say() 时,会为函数创建一个执行环境,然后通过复制函数的[[scope]]属性中的对象构建起执行环境的作用域链。此后,又有一个活动对象被创建并被推入执行环境的作用域链的前端。对于 say() 函数的执行环境而言,其作用域链中包含两个变量对象,本地活动对象和全局变量对象。显然,作用域链本质上是一个指向变量对象的指针列表,它只引用但不实际包含变量对象。

在函数中访问一个变量时,会从作用域链中搜索具有相应名字的变量。一般来讲,函数执行完毕后,局部活动对象就会被销毁,内存中仅保存全局作用域(全局执行环境的变量对象),但闭包不同。

在一个函数内部定义的函数将包含其外部函数的活动对象添加到它的作用域链中。在 say() 函数内部定义的匿名函数的作用域中,实际会包含 say() 的活动对象。在匿名函数从 say() 中被返回后,它的作用域链被初始化为包含 say() 函数的活动对象和全局变量对象。say() 函数执行完毕后,其活动对象不会被销毁,因为匿名函数的作用域链仍然在引用这个活动对象。当 say() 函数返回后,其执行环境的作用域链会被销毁,但它的活动对象仍然留在内存中,直到匿名函数被销毁,say() 的活动对象才会被销毁。

用自己的话总结一下:
当一个函数被调用时,会创建一个执行环境和作用域链,作用域链前端是当前执行环境中的变量对象。作用域链中的下一个变量对象来自外部包含环境,最后一个变量对象来自全局执行环境。函数中的变量如果在自己的执行环境中没找到,则沿着作用域链一路往上直到全局。

闭包的问题

1
2
3
4
5
6
7
8
9
10
function bindClick() {
var buttons = document.getElementsByTagName('button')
for(var i = 0; i < buttons.length; i++) {
buttons[i].addEventListener('click', function() {
console.log(i)
})
}
}

bindClick()

每个 button 打印值都是3,why?就是因为 click 方法的回调函数中 i 的值都是引用自上级作用域链,即 bindClick 函数中变量对象中的 i ,当 click 方法被触发时,i 活动变量的值早就变成 3 了

解决
给每个绑定事件自己的作用域:

1
2
3
4
5
(function(i) {
buttons[i].addEventListener('click', function() {
console.log(i)
})
})(i)

使用块作用域:

1
2
3
4
5
6
var buttons = document.getElementsByTagName('button')
for(let i = 0; i < buttons.length; i++) {
buttons[i].addEventListener('click', function() {
console.log(i)
})
}

闭包的使用场景

  • Function factories
1
2
3
4
5
6
7
8
9
10
11
12
function makeAdder(x) {
return function(y) {
return x + y
}
}

const add5 = makeAdder(5)
const add10 = makeAdder(10)

console.log(add5(2)) // 7
console.log(add10(2)) // 12
`
  • Module pattern private method
1
2
3
4
5
6
7
8
9
const salary = (function() {
let salary = 5000

return {
getSalary: function () {
return salary
}
}
})()

闭包的弊端

过度使用闭包,显然内存中会存储过多的外部作用域变量,影响性能

jasmine学习

发表于 2016-09-26

Jasmine 入门

Jasmine 的四个核心概念: 分组(Suites)、用例(Specs)、期望(Expectations)、匹配(Matchers).

开始捣鼓

例子1:

1
2
3
4
5
6
7
8
9
10
function add(a){
return a+=10;
}

describe("A suite", function() {
it("contains spec with an expectation", function() {
var a = add(10);
expect(a).toEqual(20);
});
});

describe 用于定义这组测试的标题
it 用于定义某个具体测试的标题

例子2:

1
2
3
4
5
6
7
8
9
10
11
12
13
14
15
16
17
function getVal(a){
return a || 20;
}

describe('getVal函数测试', function() {
it('contains spec with an expectation', function(){
var a = getVal(10);
var b = getVal(0);
var c = getVal('');
var d = getVal(null);

expect(a).toBe(10);
expect(b).toBe(20);
expect(c).toBe(20);
expect(d).toBe(20);
});
});

例子2:

1
2
3
4
5
6
7
8
9
10
11
12
13
14
15
16
//匹配邮箱
var reg = /[\w\.]+@\w+\.(com|cn|net)/;

describe('正则匹配邮箱', function(){
it('匹配邮箱', function() {
var a = '976962324@qq.com',
b = 'xiesenzhengyi@gmail.com',
c = 'xiesen01@outlook.com',
d = 'xiesen.01@hahaha.net';

expect(a).toMatch(reg);
expect(b).toMatch(reg);
expect(c).toMatch(reg);
expect(d).toMatch(reg);
});
});

一些常用的方法

1
2
3
4
5
6
7
8
beforeEach
afterEach
beforeAll
afterAll
toBeTruthy
toBeFalsy
toBeNull
toBeUndefined

异步

1
2
3
4
5
6
7
8
9
10
11
12
13
14
15
16
17
18
describe("Asynchronous specs", function() {
var value;

beforeEach(function(done) {
setTimeout(function() {
value = 0;
done();
}, 1000);
});

it("should support async execution of test preparation and expectations", function(done) {
value++;
setTimeout(function() {
expect(value).toBeGreaterThan(0);
//done();
}, 2000);
});
});

beforeEach 方法接受 done 表示等异步方法执行完,再调用测试用例 it
同样 it 方法中接受 done 可用于在异步节后执行测试用例

在 angular 中使用 jasmine

  1. 安装依赖
1
2
3
npm install -g karma-cli
npm install --save-dev karma karma-jasmine jasmine-core karma-chrome-launcher
npm install --save-dev angular angular-mocks

注意:如果全局装有 karma 和 jasmine,最好删除

  1. 生成 karma.conf.js
1
karma init

一路按照提示即可

  1. 第一个测试
    karma.conf.js
1
2
3
4
5
6
files: [
'node_modules/angular/angular.js',
'node_modules/angular-mocks/angular-mocks.js',
'js/greeting.js',
'test/getGreeting.spec.js'
]

js/greeting.js

1
2
3
4
5
6
7
8
9
10
11
angular.module('demo', [])
.factory('greeter', function() {
return {
getFullName: function(firstname, lastname){
return firstname + lastname;
},
getGreeting: function(name) {
return "Hello " + name;
}
};
})

test/getGreeting.spec.js

1
2
3
4
5
6
7
8
9
10
11
12
13
14
15
describe("getGreeting", function() {
var greeter;
beforeEach(module('demo'));
beforeEach(inject(function(_greeter_) { //这里可以注入依赖
greeter = _greeter_;
}));

it("says Hello to me", function() {
expect(greeter.getGreeting("Dave")).toEqual("Hello Dave");
});

it("should return fullname", function() {
expect(greeter.getFullName('xwill', 'madeit')).toEqual("xwillmadeit");
});
});

总结一下大致步骤

  • Import the module that contains the service you’re testing.
  • Inject the service you’re testing, and save it for later use. You may also want to set up mocks or spies at this point.
  • Write the tests. Each one should ideally follow the pattern of Given/When/Then, an idea from BDD (Behavior-Driven Development):
  1. Given some particular state of my app
    set up state, mock or spy functions if necessary
  2. When I call some method
    call the method you’re testing
  3. Then that method behaves in a certain way
    verify the method did the right thing

angular细节问题整理

发表于 2016-07-26

directive 中监听 controller 多个对象或数组的变化

1
2
3
4
5
6
7
8
9
10
11
12
13
14
15
16
17
18
19
20
21
22
23
24
25
26
27
28
29
30
31
32
33
34
35
36
//init
$scope.chartData = {
xdata: [],
ydata: {
guestData: [],
...
}
}

//change data,注意这里必须重新赋值,push 没用
$scope.change = function(){
$scope.chartData.xdata = [1];
$scope.chartData.ydata = {
guestData: [1,2],
browseData: [1,2],
loseData: [1,2],
avgData: [1,2]
};
}

<chart-line xdata="chartData.xdata" ydata="chartData.ydata"></chart-line>

//directive
scope: {
xdata: '=',
ydata: '='
}

//只要 xdata 或 ydata 任意一个对象变化即可
scope.$watchCollection('[xdata, ydata]', function(newVal,oldVal) {
console.log(newVal);
})
//watchGroup 亦可,注意写法差别
scope.$watchGroup(['xdata', 'ydata'], function(newVal,oldVal) {
console.log(newVal);
})

$apply 和 $digest

什么时候用 $apply 和 $digest

1
2
3
4
{{rootName}}
<div ng-controller="testCtrl">
{{name}}
</div>
1
2
3
4
5
6
7
8
9
10
11
12
13
app.controller('testCtrl', ['$scope', '$rootScope', function($scope, $rootScope){
$rootScope.rootName = 'rootName';
$scope.name = 'scopeName';

setTimeout(function(){
console.log('in');
$scope.$apply(function(){
$rootScope.rootName = 'rootName2';
$scope.name = 'scopeName2';
});
// $scope.$apply(); 不推荐
},2000);
}]);
  • 当使用非 angular 包装方法,如 setTimeout 等原生 js 方法去改变 model 值的时候,需手动调用 $apply 或 $digest 去更新 view 显示。
  • $apply 会一直向上检查到 $rootScope 变化。$digest 只会检查自己及子 scope 变化。
  • 使用 $apply 时,总是 $scope.$apply(function(){}) 这样使用,因为这样 angular 会 try… catch…

理解 $apply 和 $digest

变得更强!思维发散练习

发表于 2016-07-05

为什么要写这篇

想学到大神们优秀的思想,敏锐的解决问题的思路!

给定一个字符串,若字符串大于4位字符,则保留后四位,前面的字符用”#”代替

我的最优方案:

1
2
3
4
5
6
7
function maskStr(cc) {
var length = cc.length;
if (length > 4) {
return cc.substr(0, length - 4).replace(/./g, '#') + cc.substr(length - 4);
}
return cc;
}

让人眼前一亮的牛逼方案:

1
2
3
function maskify(cc) {
return cc.slice(0, -4).replace(/./g, '#') + cc.slice(-4);
}

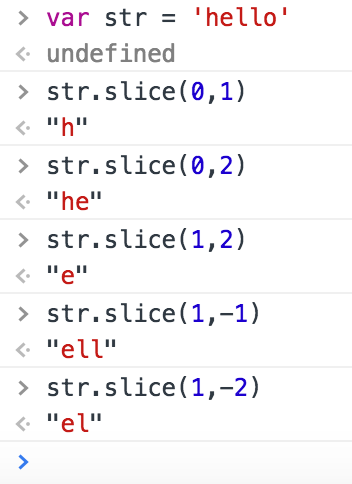
其实就是 slice 方法负数的妙用!

这里涉及到就是同为切割字符串的函数,slice 和 substr 有什么区别?

  • slice(start,end) 接受两个参数

    start:要抽取的片断的起始下标。如果是负数,则该参数规定的是从字符串的尾部开始算起的位置。也就是说,-1 指字符串的最后一个字符,-2 指倒数第二个字符,以此类推。
    end:紧接着要抽取的片段的结尾的下标。若未指定此参数,则要提取的子串包括 start 到原字符串结尾的字符串。如果该参数是负数,那么它规定的是从字符串的尾部开始算起的位置。

常用(隐藏手机号中间四位):

1
2
3
4
function makeStr(str){
//这里可以这样记,3-7 即 x>3 && x<=7,x=4,5,6,7
return str.slice(0,3) + str.slice(3,7).replace(/./g,'#') + str.slice(7,11);
}

  • substr(start,length) 接受两个参数

    start 必需。要抽取的子串的起始下标。必须是数值。如果是负数,那么该参数声明从字符串的尾部开始算起的位置。也就是说,-1 指字符串中最后一个字符,-2 指倒数第二个字符,以此类推。
    length 可选。子串中的字符数。必须是数值。如果省略了该参数,那么返回从 stringObject 的开始位置到结尾的字串。

重要事项:ECMAscript 没有对 substr 方法进行标准化,因此反对使用它。

长度大于5位的字符串反向

需求:输入一个字符串,形式为 hello world kobe,处理长度大于5位的字符串反向。返回结果 olleh dlrow kobe
我的方案:

1
2
3
4
5
6
7
8
9
10
function spinWords(word){
word = word.split(' ');
for(var i=0;i<word.length;i++){
if(word[i].length>=5){
word[i] = word[i].split('').reverse().join('');
}
}

return word.join(' ');
}

牛逼的方案1:

1
2
3
4
5
function spinWords(word){
return word.split(' ').map((word) => {
return (word.length>4)?word.split('').reverse().join(''):word
}).join(' ');
}

牛逼的方案2:

1
2
3
4
5
function spinWords(word){
return word.replace(/\w{5,}/g,(w) => {
return w.split('').reverse().join('');
});
}

这里 word.replace(/\w{5,}/g) 中 \w 表示匹配所有的下划线,字母,数字;{5,}表示前面的字符至少出现5次,g表示全局。

牢记:字符串reverse的最常用方法 str.split(‘’).reverse().join(‘’),先转为数组reverse,然后转回字符串

输入一个正整数,计算从1加到该数的合

我的方案

1
2
3
4
5
6
7
8
9
10
function sum(n){
if(typeof n !='number' || n<=0 || n%1!=0){
return false;
}
var sum=0;
for(var i=1;i<=n;i++){
sum+=i;
}
return sum;
}

更优的解决方案

首先,从1加到某数有个公式,呃,数学差连这个都忘了 n*(n+1)/2
其次,要想办法把简单的 if 转化成 三元表达式!!!

1
2
3
function sum(n){
return (typeof n !='number' || n<=0 || n%1!=0)?false:n*(n+1)/2;
}

ps:判断一个数是否为正整数最简单的方法

1
Number.isInteger(n) && n > 0

输入一个字符串,判断该字符串中 x 和 o 的数量是否一致,不分大小写

我的方案:

1
2
3
4
5
6
7
8
9
10
11
12
13
14
15
16
17
function XO(str) {
str = str.split('');
var x = 0,
o = 0;
str.map((data) => {
switch (data.toLowerCase()) {
case 'x':
x += 1;
break;
case 'o':
o += 1;
break;
}
});

return x == o;
}

更优的解决方案:

1
2
3
4
5
function XO(str){
var x = str.match(/x/g);
var o = str.match(/o/g);
return (x && x.length) === (o && o.length);
}

发现n多次处理数据匹配都是用正则更高效!
这里 match 的用法有两种:

1
2
stringObject.match(searchvalue)
stringObject.match(regexp)

searchvalue 必需。规定要检索的字符串值。
regexp 必需。规定要匹配的模式的 RegExp 对象。如果该参数不是 RegExp 对象,则需要首先把它传递给 RegExp 构造函数,将其转换为 RegExp 对象。

注意:

如果 regexp 没有标志 g,那么 match() 方法就只能在 stringObject 中执行一次匹配。如果没有找到任何匹配的文本, match() 将返回 null。否则,它将返回一个数组,其中存放了与它找到的匹配文本有关的信息。该数组的第 0 个元素存放的是匹配文本,而其余的元素存放的是与正则表达式的子表达式匹配的文本。除了这些常规的数组元素之外,返回的数组还含有两个对象属性。index 属性声明的是匹配文本的起始字符在 stringObject 中的位置,input 属性声明的是对 stringObject 的引用。
如果 regexp 具有标志 g,则 match() 方法将执行全局检索,找到 stringObject 中的所有匹配子字符串。若没有找到任何匹配的子串,则返回 null。如果找到了一个或多个匹配子串,则返回一个数组。不过全局匹配返回的数组的内容与前者大不相同,它的数组元素中存放的是 stringObject 中所有的匹配子串,而且也没有 index 属性或 input 属性。

给定一个秒数,转换为 HH:mm:ss

大神的代码:

1
2
3
4
5
6
function humanReadable(seconds) {
var pad = function(x) { return (x < 10) ? "0"+x : x; }
return pad(parseInt(seconds / (60*60))) + ":" +
pad(parseInt(seconds / 60 % 60)) + ":" +
pad(seconds % 60)
}

clear my mind series - css

发表于 2016-07-04

css 中的一些容易搞不灵清的问题整理

这篇主要记录一些 css 易搞不灵清的问题

关于元素使用百分比做高度

1
2
3
4
5
6
7
8
9
10
11
12
*{
padding: 0;margin: 0;
}
.box{
width: 100px;
background-color: pink;
}
.inner{
height: 10%;
width: 20px;
background-color: yellow;
}
1
2
3
4
<div class="box">
<h3>this is a test</h3>
<div class="inner"></div>
</div>

w3c 中当元素高度设置为百分比时,其高度定义:

基于包含它的块级对象的百分比高度

即 box 基于 body,body 基于 html。

inner 的 height 百分比基于 box 的 height 属性,如 box 高度为 120px,则 inner 的高度为 12px;box 没有显式的设置高度,虽然 h3 将 box 的宽度撑大,但 inner 高度仍未 0。

左侧固定,右侧弹性

方法一:

1
2
3
4
5
6
7
8
9
10
11
12
13
14
*{
padding: 0;margin: 0;
}
.left{
width: 70px;
height: 50px;
float: left;
background-color: pink;
}
.right{
width: 100%;
height: 50px;
background-color: yellow;
}

1
2
<div class="left">left</div>
<div class="right">right</div>

实际上 left 覆盖了 right 并且把 right 内的元素向右挤了 70px,当 left 不设置背景色时,黄色充满 100% 宽度。

方法二:

1
2
3
4
5
6
7
8
9
10
11
12
13
14
15
16
17
18
19
20
*{
padding: 0;margin: 0;
}
.col{
float: left;
height: 50px;
}
.left{
width: 70px;
margin-right: -70px; /*负值大于等于 70px 即可*/
background-color: pink;
}
.right{
width: 100%; /*定义在右侧,会盖掉 left 所以颜色必须设置在 inner 元素*/
}
.inner{
height: 50px;
margin-left: 70px;
background-color: green;
}

1
2
3
4
<div class="left col">left</div>
<div class="right col">
<div class="inner">right</div>
</div>

当给 left 设置 margin-right: -70px 时,即让 right 压在 left 上,若此时背景色设置在 right 上,则 left 内容完全被遮挡,所以需要设置在 inner 上。

结论:

float 的元素脱离文档流,压在不浮动的元素上面;
两个浮动的元素重叠时(margin为负值),定义在后面的元素会压在前面的元素上。

盒模型 margin 折叠问题

1
2
3
4
5
6
7
8
9
10
11
12
.box{
width: 300px;
height: 200px;
margin-top: 10px;
background-color: pink;
}
.inner{
width: 80px;
height: 80px;
margin-top: 20px;
background-color: yellow;
}
1
2
3
4
5
<div class="box">
<div class="inner">
hello
</div>

</div>

结果是 inner 和 box 一起距离 body 20px,且 inner 和 box 之间没有 margin-top!这是为什么呢?

在常规文档流中,2个或以上的块级盒模型相邻的垂直margin会被折叠。最终的margin值计算方法如下:
全部都为正值,取最大者;
不全是正值,则都取绝对值,然后用正值减去最大值;
没有正值,则都取绝对值,然后用0减去最大值。

具体参考这篇

解决方法有很多,最常用的:
在父层div加上:overflow: hidden

为什么 input,img等内联元素可以设置宽高?

关于这个问题,css中有这么两个名词,替换和不可替换元素。那么这两个莫名其妙的东东到底是什么意思呢?
为什么 input,img等内联元素可以设置宽高

这里我们只是需要知道,img、input等行内元素比较特殊,他们属于可替换元素:

替换元素一般有内在尺寸,所以具有width和height,可以设定。例如你不指定img的width和height时,就按其内在尺寸显示,也就是图片被保存的时候的宽度和高度。对于表单元素,浏览器也有默认的样式,包括宽度和高度。

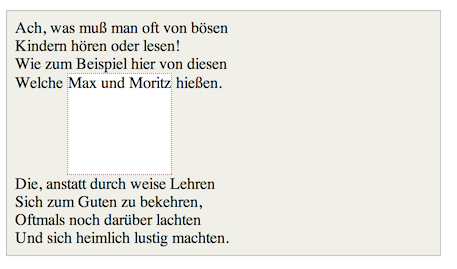
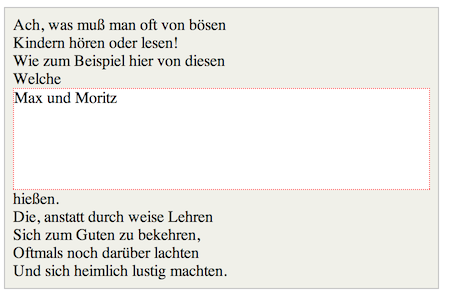
inline,inline-block 和 block 到底有什么区别

三张图说明一切:
inline

inline-block

block

三者的区别

清除浮动几种方式PK

最常用的

  • 父元素 overflow: hidden
  • 下面的元素 clear: both

清除浮动理论上就应该用 clear,不然名称取着干嘛~
这里关于 overflow: hidden 清除浮动的问题会有什么问题

当然我们是牛逼的要用牛逼的方法,以下是 bootstrap 中 clearfix 的样式

1
2
3
4
5
6
7
.clearfix:before, .clearfix:after{
display: table;
content: "";
}
.clearfix:after{
clear: both;
}

只需在父元素上加上 clearfix 样式即可

opacity: 0 和 visibility: hidden 的区别

opacity: 0 和 visibility: hidden 同样可以使一个元素看不见,但是仍然占据着文档空间。区别在于 visibility: hidden 使这个元素不能响应事件。

More Detail

12345
xwillmadeit

xwillmadeit

44 日志
48 标签
© 2017 xwillmadeit
由 Hexo 强力驱动
主题 - NexT.Muse