xwillmadeit

  • 首页
  • 归档
  • 标签

async & await

发表于 2017-04-12

async / await 几个重点概念

整理一下 async / await 在使用过程中容易搞不清楚的概念

async function 被调用后会返回一个 promise

1
2
3
4
5
async function say() {

}

say().then().catch()

如果 async function 有 return 值(非 promise.reject),则调用该 function 后返回的 promise 的 resolve 值为该 return 值

1
2
3
4
5
6
7
async function say() {
return 20
return Promise.resolve(20)
}

say().then(res => console.log('res is: ' + res)).catch(err => console.log('err is: ' + err))
// res is 20

如果 async function throw Error,则调用该 function 后返回的 promise 的 reject 值为该抛出值

1
2
3
4
5
6
7
8
9
10
11
function CustomError(msg) {
this.msg = `custom error is ${msg}`
}

async function say() {
throw 42
throw new Error('45')
throw new CustomError('fuck...')
}

say().then(res => console.log(res)).catch(err => console.log(err))

await 关键字用于暂停 async function,等待 promise 的 resolve 值,如果 promise 被 reject,则可在 async function 中 catch

1
2
3
4
5
6
7
8
9
10
11
12
async function say() {
let a
try {
a = await Promise.reject('reject text')
} catch(e) {
a = 'default text'
}
return a
}

say().then(res => console.log('res is: ' + res)).catch(err => console.log('err is: ' + err))
// res is default text

react-hot-loader v3 + webpack v2之坑

发表于 2017-03-21

坑

.babelrc 文件的配置必须指定 module: false

1
2
3
4
5
6
7
8
9
{
"presets": [
["env", { "modules": false }],
"react"
],
"plugins": [
"react-hot-loader/babel"
]
}

相关解释:

Note that because webpack 2 has built-in support for ES2015 modules, you won’t need to re-require your root component in module.hot.accept.

https://webpack.js.org/guides/hmr-react/

几种实现方式

  1. 使用 npm scripts 执行 webpack-dev-server
1
2
3
"scripts": {
"dev": "webpack-dev-server --hot --history-api-fallback --open"
}

这种方式的完整代码:
https://github.com/xwillmadeit/webpack2-hmr/tree/master

  1. 在 webpack.config.js 中配置 devServer 参数
1
2
3
4
5
6
7
8
9
10
11
12
plugins: [
new webpack.HotModuleReplacementPlugin(),
new webpack.NamedModulesPlugin(),
new HtmlWebpackPlugin({
template: './index.html'
})
],
devServer: {
port: 8081,
contentBase: path.resolve(__dirname, 'dist'),
hot: true
}

注意:这种方式必须配置 hot: true,同时在插件中加入 new webpack.HotModuleReplacementPlugin()

这种方式的完整代码:
https://github.com/xwillmadeit/webpack2-hmr/tree/option2

  1. 使用 webpack-dev-middleware 和 webpack-hot-middleware
1
2
3
4
5
6
7
8
9
10
11
12
13
14
15
// webpack.config.js
entry: {
app: [
'webpack-hot-middleware/client?reload=true',
'react-hot-loader/patch',
'./index.js'
]
},
plugins: [
new webpack.HotModuleReplacementPlugin()
]

// server.js
app.use(webpackMiddleware(compiler))
app.use(hotMiddleware(compiler))

完整代码:
https://github.com/xwillmadeit/webpack2-hmr/tree/middleware

npm scripts 进阶

发表于 2017-02-13

使用 && 顺序执行

1
npm run clean && npm run build

npm run clean 执行完毕后 npm run build 才会执行

使用 & 并行执行

1
npm run dev:client & npm run dev:server

注意,最好在命令尾部加上 & wait,这样命令行进程才能彻底退出

1
npm run dev:client & npm run dev:server & wait

npm script lifecycle hooks (pre,post)

1
2
3
pretest
test
posttest

在任意命令前加 pre,post 即会在相应命令前、后执行

npm-run-all 包

1
npm-run-all dev:client dev:server

默认顺序执行,如果想并行执行,

1
npm-run-all --parallel dev:client dev:server

npm run all 自动帮你在后面增加 & wait

better-npm-run 包

1
2
3
4
5
6
7
8
9
10
11
12
13
"scripts": {
"dev:client": "better-npm-run dev:client"
},
"betterScripts": {
"dev:client": {
"command": "cross-env babel-node server/webpack.devServer.js",
"env": {
"NODE_ENV": "development",
"BABEL_ENV": "client",
"PORT": 4001
}
}
}

prototype && inheritance

发表于 2017-02-10

prototype 是哪里来的?

1
function Person() {}

这是一个简单的函数声明,除了声明函数,还发生了什么?

1
Person.prototype = { constructor: Person };

这里我们发现函数 Person 声明完以后,多了一个叫 prototype 的属性,它也是一个对象,包含一个 constructor 属性,constructor 也是一个引用,指向了 Person 函数本身

..proto.. 是什么鬼?

1
2
3
var xwill = new Person();

console.log(xwill); // { __proto__: Object}

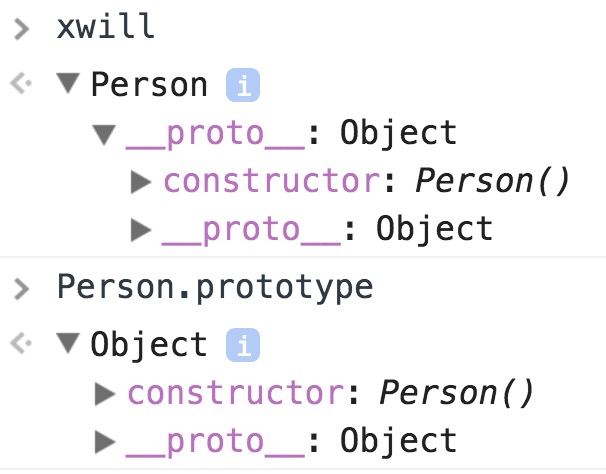
我们使用 new 关键字生成一个 Person 的实例对象 xwill,然后打印了这个对象,我们发现,xwill 对象中出现了一个 proto 属性,而这个 proto 属性的值是一个对象。展开这个对象

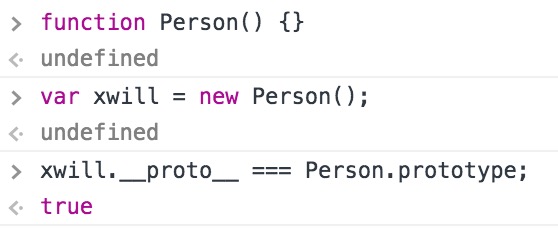
很清楚了吧,xwill 中的 proto 对象和 Person.prototype 对象实际上是同一个,xwill 的 proto 对象指向了 Person.prototype 对象

我们来验证一下

嗯,确实是这样

沿着 prototype 寻找属性

思考一个问题,当我们去获取 xwill 对象的某个属性的时候,在 js 引擎中,到底发生了什么?

1
2
// what happend in js engine ???
console.log(xwill.name);

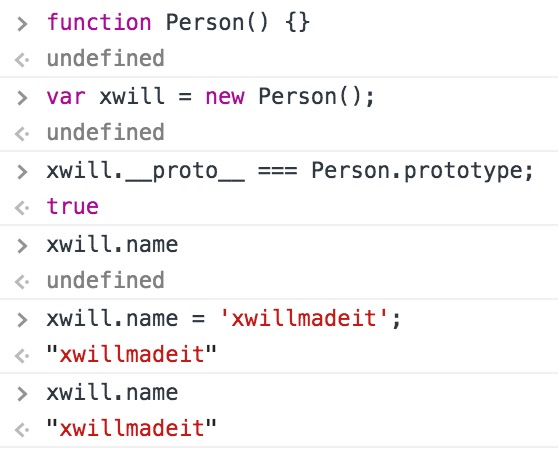
这个问题有点高级,我们先来回答一个简单的问题,console.log(xwill.name) 会输出什么?
毫无疑问, xwill 暂时只有一个 proto 属性,并没有 name 属性,所以输出 undefined

如果我们给 xwill.name 赋值,那么显然 xwill.name 就会等于所赋的值

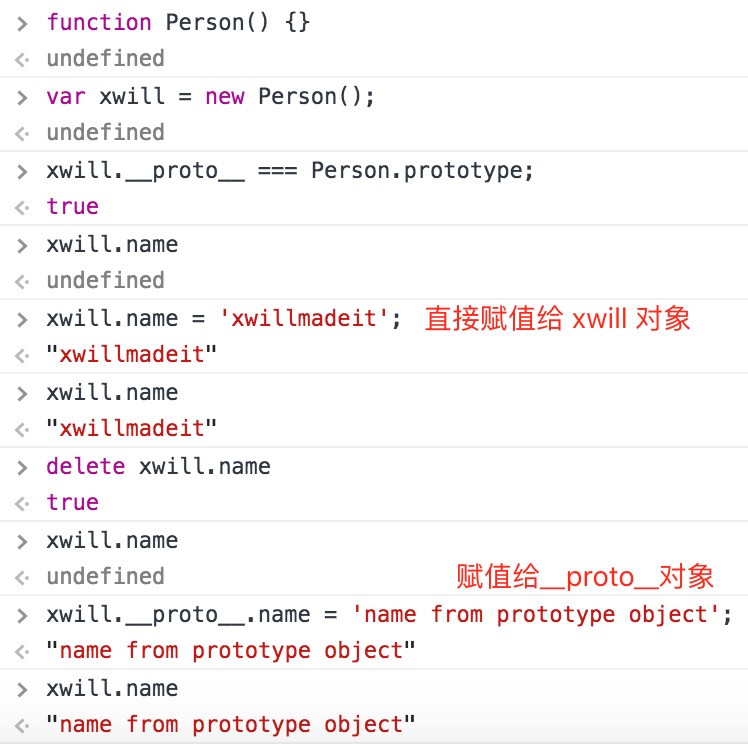
实际上,当我们在获取 xwill.name 的值的时候,js 引擎做了两件事

  1. 寻找 xwill 对象上有没有 name 属性,有,则返回
  2. 如果没有,则寻找 xwill 的 proto 对象中有没有 name 属性(由于 xwill 的 proto 对象等于 Person 的 prototype 对象,所以就相当于寻找 Person 的 prototype 对象中是否有 name 属性),有,则返回

现在我们可以回答一个常见的问题,为什么使用 prototype 定义方法 ?

1
2
3
4
5
6
7
8
9
10
11
12
13
function Person(name) {
this.name = name;
}

Person.prototype.say = function() {
console.log('hello');
}

var p1 = new Person('xwill');
var p2 = new Person('jack');

p1.say(); // hello
p2.say(); // hello

p1 和 p2 对象并没有 say 方法,但是它们的 proto 对象中有 say 方法(因为 Person 的 prototype 对象定义了 say 方法,而 p1,p2 的 proto 对象又都等于 Person 的 prototype 对象),所以,相当于实现了方法共享,这样做的好处就是如果有100个对象,那么这100个对象共享一个方法,而不是各自有一个一样的方法

prototype 继承 (classic inheritance)

有了上面的基础,我们就可以通过改变 prototype 的指向,从而达到继承的效果

1
2
3
4
5
6
7
8
9
10
11
12
13
14
15
16
17
18
19
20
21
22
23
24
25
26
27
28
29
30
31
32
33
34
35
36
37
38
39
40
41
42
43
44
45
46
function Person(name, jobName) {
this.name = name
this.jobName = jobName
}

Person.prototype.getPersonName = function() {
console.log(this.name)
}

function Job(jobName) {
this.jobName = jobName
}

Job.prototype.getJobName = function() {
console.log(this.jobName)
}

var p1 = new Person('xwill', 'worker')

// 如果这样做,只会改变 p1 单个实例的 __proto__ 指向 Job.prototype,很明显,p1 将不会再有 Person.prototype 上的所有方法,而创建的其他 Person 实例仍然没有 getJobName 的方法
p1.__proto__ = Job.prototype // not work

// 下面几种改变 prototype 指向的方法都可以使 Person 对象继承到 Job 对象的 getJobName 方法
p1.__proto__.__proto__ = Job.prototype // works
Person.prototype.__proto__ = Job.prototype // works too

// Object.create
Person.prototype = Object.create(Job.prototype, {
constructor: {
value: Person,
enumerable: false,
writable: true,
configurable: true
}
})

// ES6 特性
Object.setPrototypeOf(Person.prototype, Job.prototype); // also works

console.log(Person.prototype.__proto__ === Job.prototype); //true
p1.getPersonName();
p1.getJobName();

var p2 = new Person('xwill2', 'developer');
p2.getPersonName();
p2.getJobName();

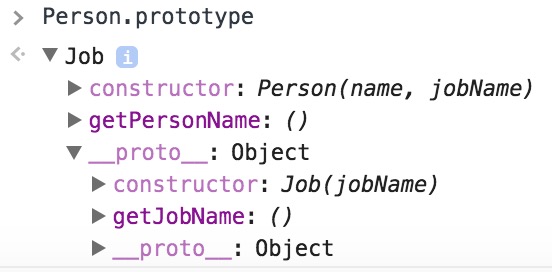
这时候看看 Person.prototype 的 proto 属性,指向的对象已经是 Job 的 prototype 了

现在 p1 和 p2 既是 Person 的实例,又是 Job 的实例

1
2
3
4
console.log(p1 instanceof Person); //true
console.log(p1 instanceof Job); //true
console.log(p2 instanceof Person); //true
console.log(p2 instanceof Job); // true

Prototypal Inheritance

这是另一种原型继承模式

1
2
3
4
5
6
7
8
9
10
11
12
13
14
15
16
17
18
// Prototypal Pattern
var human = {
species: 'human',
}

var xwill = {};

var xwill = Object.create(human);
// xwill.__proto__ = human;
xwill.species = 'superman';
console.log(xwill.species); // superman

delete xwill.species;
console.log(xwill.species); // human

console.log(Object.getPrototypeOf(xwill) === human); // true

console.log(xwill.hasOwnProperty('species')); // false

连续继承:

1
2
3
4
5
6
7
8
9
10
11
// prototypal
var human = {
species: 'human',
}

var musician = Object.create(human);
musician.instrument = 'drum';

var xwill = Object.create(musician);
console.log(xwill.instrument);
console.log(xwill.species);

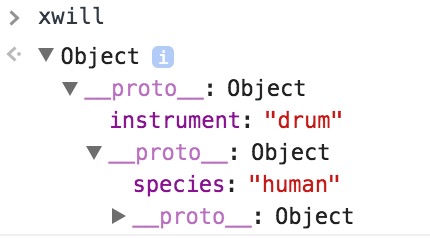
这里 xwill 继承了 musician,而 musician 继承了 human,所以 xwill 即可以使用 musician 上的属性,也可以使用 human 上的属性

Prototypal Pattern Video
Prototypal inheritance

Others

nodejs 0.1.0 使用的继承工具方法

1
2
3
4
5
6
7
8
9
10
11
12
13
14
15
16
17
18
19
20
21
function inherits(ctor, superCtor) {
ctor.super_ = superCtor;
ctor.prototype = Object.create(superCtor.prototype, {
constructor: {
value: ctor,
enumerable: false,
writable: true,
configurable: true
}
});
};

function Person(name) {
this.name = name;
}

function Musician(name) {
Musician.super_.call(this, name);
}

inherits(Musician, Person);

node 5.9.1 使用的继承方法已经改成了使用 Object.setPrototypeOf(ES6)

1
2
3
4
5
6
7
8
9
10
11
12
13
function inherits(ctor, superCtor) {
if (ctor === undefined || ctor === null)
throw new TypeError('The constructor to `inherits` must not be null or undefined.');

if (superCtor === undefined || superCtor === null)
throw new TypeError('The super constructor to `inherits` must not be null or undefined.');

if (superCtor.prototype === undefined)
throw new TypeError('The super constructor to `inherits` must have a prototype.');

ctor.super_ = superCtor;
Object.setPrototypeOf(Musician.prototype, Person.prototype);
};

javascript 中 constructor 的那些事儿

发表于 2017-02-10

有哪些 constructor

在 javascript 中,涉及到 constructor 的概念有三个

  • 构造函数可被称为一个 constructor
  • 所有的对象有一个 constructor 属性
  • ES6 语法中有一个 constructor 关键字

一脸懵逼…

构造函数 —— constructor

1
2
3
function Person(name) {
this.name = name;
}

这就是 javascript 中的构造函数,又可称为一个构造器(constructor)

对象的 constructor 属性

Object.prototype.constructor 属性返回了一个引用,这个引用指向产生实例的构造函数

Returns a reference to the Object constructor function that created the instance object

1
2
3
4
5
6
function Person(name) {
this.name = name;
}

var man = new Person('xwill');
console.log(man.constructor === Person); // 通过 new 关键字生成的对象,它的 constructor 属性指向构造函数本身
1
2
3
4
5
6
7
8
9
10
11
12
13
14
var o = new Object;
var str = new String('hello');
var arr = [];

var cat = {
name: 'mark'
}

console.log(o.constructor === Object); // true
console.log(str.constructor === String); // true
console.log(arr.constructor === Array); //true

// 通过字面量定义的对象,它的 constructor 指向 Object
console.log(cat.constructor === Object);

constructor 属性会被覆盖

1
2
3
4
5
6
7
8
9
10
11
12
13
14
15
function Person(name) {
this.name = name;
}

function Animal(name) {
this.name = name;
}

var man = new Person('xwill');

console.log(man.constructor === Person); // true
// constructor 属性的引用对象变成了 Animal
man.constructor = Animal;
console.log(man.constructor === Animal); // true
console.log(man.constructor === Person); // false

这就是最好不用 constructor 确定实例(instance)所属类型的原因
判断实例类型,用 instanceof 关键字

🐂(new)背后的故事

发表于 2017-02-09

new Foo() 的背后到底发生了什么

1
2
3
function Foo() {}

var f = new Foo()

🐂 背后的故事到底是什么?

  • 一个新对象 f 生成了,它继承了 Foo 的 prototype
    A new object is created, inheriting from Foo.prototype

  • 构造函数 Foo 被执行了,Foo 中的 this 绑定给了新生成的对象 f
    The constructor function Foo is called with the specified arguments, and with this bound to the newly created object. new Foo is equivalent to new Foo(), i.e. if no argument list is specified, Foo is called without arguments.

  • 如果没有在 Foo 中显示的 return 一个对象, 那么 f 就等于默认构造出来的对象
    The object returned by the constructor function becomes the result of the whole new expression. If the constructor function doesn’t explicitly return an object, the object created in step 1 is used instead. (Normally constructors don’t return a value, but they can choose to do so if they want to override the normal object creation process.)

1
2
3
4
5
6
7
function Car() {}

var c = new Car()

Car.prototype.name = 'bmw'

console.log(c.name)

根据上面的结论,当 c 对象生成时,它继承了 Car.protptype,所以当

1
Car.prototype.name = 'bmw'

执行后,c 对象也有 name 属性,即来自 Car.prototype 的属性

一个思考?下面的代码会打印出什么?

1
2
3
4
5
6
7
function Foo(name) {
this.name = name
return null
}

var f = new Foo('xwill')
console.log(f)

结果:

1
{ name: 'xwill' }

new operator

React 开发时遇到的问题总结

发表于 2017-02-09

Stateless Component

和普通的 Component 相比,Stateless Component 没有自己的 state,通常用以下函数方式定义
(Eslint prefer-stateless-function 规则)

1
const Home = (props) => <h2>This is our {props.title}</h2>

Stateless Component 主要是展示作用

React 一个组件只能返回一个根节点

这个问题很有意思,实际上不是 React 的问题

1
2
3
4
// jsx
render() {
return <div>hello</div><div>world</div>
}
1
2
3
4
// under the hood
render() {
return React.createElement("div", null) React.createElement("div", null)
}

其实就是一个方法不可能有两个返回值😊

super() 和 super(props) 的区别

问题1:在 Component 的 constructor 中为什么需要调用 super()?
这是 ES6 关于 Class 的概念:

子类的构造器必须调用 super()
在子类的 constructor 中,只有调用了 super,才可以使用 this 作用域

ES6 Class super

问题2:component constructor 中调用 super() 和 super(props) 的区别?
我们知道,在 component 构造方法的外围,可以直接使用 props,只有一种情况下需要在 constructor 中调用 super(props):

当在 constructor 中需要使用 props 的时候

然而,注意,在 React 官方文档中有这么一句

Class components should always call the base constructor with props.

Difference Between super() and super(props)
React ES6 class constructor super()

component 中事件绑定 this 的几种方式

我们经常看到下面这些绑定 this 的代码

1
2
3
4
constructor(props) {
super(props);
this.handleChange = this.handleChange.bind(this);
}

或者

1
onChange={this.handleChange.bind(this)}

亦或者

1
onChange={e => this.handleChange(e)}

原来 React.createClass 会自动绑定 this,但是使用 ES6 Class 定义 component 后,必须手动绑定 this

5 approaches to handle binding this

Component 生命周期几个关键 Hooks

componentWillMount
componentWillMount 发生在 render 方法之前,所以当在此数 setState 不会触发 re-render

componentDidMount
componentDidMount 在 component render 方法之后执行,通常在此处进行 Ajax 请求,当 setState 触发时,ComponentDidMount 不会被重新执行

componentWillUpdate
componentDidUpdate

componentWillUpdate(prevProps, prevState),componentDidUpdate(prevProps, prevState) 在其 props 所属父元素触发 re-render 或自己触发 setState 进行 re-render 时,都会被执行

1
2
3
4
5
6
7
8
9
10
11
12
13
14
15
// App.js
onclick() {
this.stateState({
// ...
});
}

<div>
<Box name="i am a box" />
<h2>I am an app</h2>
<button onClick={this.onclick}>change app state</button>
</div>

// Box.js
<div>{this.props.name}</div>

当点击 button 时,会触发 App Component 和 Box Component 的以下事件(第二个红框),注意顺序:

image

Webpack2 core concept

发表于 2017-02-07

Code Splitting

Code Splitting 即代码分割,可以把一个大 bundle 分割成多个小 bundle,按需加载,从而达到性能优化

在 Webpack 中主要有两种 Code Splitting

  • 将第三方的类库,框架,几乎不会修改的工具方法等单独打成包,这样浏览器可以缓存
  • 按需加载打包,比如路由切换加载或点击事件加载

Code Splitting Doc

Tree Shaking

Tree Shaking 可以理解为排除没有用到的代码

使用 import 导入了某个模块,但是该模块并没有被使用,则打包时,webpack 会自动把该模块排除在外

Tree Shaking 的概念来自于 Rollup,它基于 ES6 的 import/export,它也是 Webpack2 的核心之一

1
2
3
4
5
6
7
8
9
10
11
12
// math.js
export function square(x) {
return x * x;
}

export function cube(x) {
return x * x * x;
}

// index.js
import { cube } from './math';
console.log(cube(5));

index.js 中,square 没有被导入,webpack 在打包时会将其排除
即便如下导入 square,但 square 并没有被使用,webpack 也会将其排除

1
2
3
// index.js
import { cube, square } from './math';
console.log(cube(5));

这就是 Tree Shaking 的核心概念
Tree Shaking Doc

Tree Shaking 实战总结:

  1. Tree Shaking 功能建立在 ES6 的模块机制上,可以在打包时删除没有被使用的模块代码
  2. 通过 ES6 直接 export/export default 的模块才能够在引入后被 webpack Tree Shaking
  3. 不能使用 babel 转换 ES6 module,即需要指定

    1
    2
    3
    4
    5
    6
    // .babelrc
    {
    "presets": [
    ["env", { modules: false }]
    ]
    }
  4. 即使以 npm i package 引入 ES6 导出的模块,如果该模块文件夹下有 .babelrc 文件,则必须删除,或指定 modules: false,因为 babel 的 lookup behavior

一些注意事项

  • webpack -p 利用了 uglify2 压缩代码,但是 uglify2 暂不支持 ES6

CommonsChunkPlugin

第三方包提取

1
2
3
4
5
6
7
8
9
10
11
12
13
14
15
16
17
18
19
20
21
22
23
24
25
26
27
28
29
30
31
32
33
34
35
// home.js
import _ from 'lodash'
import { add } from './math'

console.log(add(4, 5))
console.log('home page...')

// about.js
import _ from 'lodash'
import { add } from './math'

console.log(add(1, 5))
console.log('about page...')

// webpack.config.js
entry: {
vendor: ['lodash'],
home: './src/home.js',
about: './src/about.js'
},
output: {
path: resolve(__dirname, 'dist'),
filename: '[name].js'
},
plugins: [
new webpack.optimize.CommonsChunkPlugin({
// 顺序很重要
name: ['common', 'vendor']
})
]

// home.html
<script src="dist/vendor.js"></script>
<script src="dist/common.js"></script>
<script src="dist/home.js"></script>

以上配置运行 webpack 会在 dist 目录生成三个文件:

  • home.js(home.js 自己的代码)
  • about.js(about.js 自己的代码)
  • common.js(add 方法的代码)
  • vendor.js(webpack启动代码 + lodash 代码)

注意,CommonsChunkPlugin name 参数的顺序非常重要

Under The Hood:

  • webpack 会生成 common.js,包含 webpack 启动代码 + lodash 代码 + add 方法代码
  • webpack 生成 home.js 和 about.js,包含
  • webpack 又生成了 vendor.js,因为在入口指定了 vendor: [‘lodash’],所以 vendor.js 和 common.js
    的共同拥有:webpack 启动代码和 lodash 代码

然后
此时,webpack 把 webpack 启动代码和 lodash 代码从 common.js 抽取到了 vendor.js,所以 common.js 只剩了 add 方法代码

聊聊 Function Composition

发表于 2017-01-31

定义

Function Composition 是把两个或多个方法合成为一个新方法的过程
Function composition is the process of combining two or more functions to produce a new function. Composing functions together is like snapping together a series of pipes for our data to flow through.

实例

一个常见需求:把下面数组中所有的 type 为 Household 的找出来,计算他们的 price 总和

1
2
3
4
5
6
7
8
9
10
11
12
13
14
15
16
17
18
19
const expenses = [
{
name: 'Rent',
price: 500,
type: 'Household'
}, {
name: 'Netflix',
price: 5.99,
type: 'Services'
}, {
name: 'Gym',
price: 15,
type: 'Health'
}, {
name: 'Bills',
price: 100,
type: 'Household'
}
];

使用 Pure Function + Pure Function 我们这样处理

1
2
3
4
5
6
7
8
9
10
11
12
13
const typeHousehold = function(arr) {
return arr.filter(function(item) {
return item.type === 'Household';
});
}

const allPriceHousehold = function(arr) {
return arr.reduce(function(total, item) {
return total += item.price;
}, 0);
}

console.log(allPriceHousehold(typeHousehold(expenses))); //600

我们也可以使用 Function Composition

1
2
3
4
5
6
7
8
9
10
11
12
13
14
15
16
17
18
19
20
const typeHousehold = function(arr) {
return arr.filter(function(item) {
return item.type === 'Household';
});
}

const sumAll = function(arr) {
return arr.reduce(function(total, item) {
return total += item.price;
}, 0);
}

const compose = function(f, g) {
return function(x) {
return g(f(x));
}
}

const sumAllHousehold = compose(typeHousehold, sumAll);
console.log(sumAllHousehold(expenses)); //600

compose 函数如果用 es6 写的话,更佳简洁

1
const compose = (f, g) => x => g(f(x));

工具库

lodash 提供了 .flow 和 .flowRight 方法来获得一个合成过的方法

1
2
3
4
const sumAllHousehold = _.flow([typeHousehold, sumAll]); // 从左到右
const sumAllHousehold = _.flowRight([sumAll, typeHousehold]); //从右到左

console.log(sumAllHousehold(expenses)); //600

Ramda 也提供了 R.compose 方法

1
2
3
const sumAllHousehold = R.compose(sumAll, typeHousehold);

console.log(sumAllHousehold(expenses)); //600

A Gentle Introduction to Composition in JavaScript

What is Function Composition

聊聊 Pure Function

发表于 2017-01-31

定义

Pure Function 是不依赖且不改变其外部作用域中变量的函数
A pure function doesn’t depend on and doesn’t modify the states of variables out of its scope.

Pure Function 是 Functional Programming 的核心

稍微有点抽象,别急…

不依赖 & 改变外部作用域变量的值

看下面这个 function

1
2
3
4
5
6
7
8
9
10
11
12
13
var values = { a: 1 };

function impureFunction(items) {
var b = 1;

items.a = items.a * b + 2;

return items.a;
}

var c = impureFunction(values);

console.log(values, c); // {a: 3}, 3

这个 function 依赖了其外部作用域中的变量,并且把外部作用域变量中的属性值改了,这个 function 不是干净的 function,它容易产生副作用(side effect)

使用 Pure Function 改写

1
2
3
4
5
6
7
8
9
10
11
12
13
var values = { a: 1 };

function impureFunction(a) {
var b = 1;

a = a * b + 2;

return a;
}

var c = impureFunction(values.a);

console.log(values, c); // {a: 1}, 3

这时候函数并没有改变 values 对象的 a 属性值,它是一个 Pure Function

再来看一个常见的需求,求以下对象数组中所有 price 总和

1
2
3
4
5
6
7
8
9
10
11
12
13
14
15
16
17
18
19
const expenses = [
{
name: 'Rent',
price: 500,
type: 'Household'
}, {
name: 'Netflix',
price: 5.99,
type: 'Services'
}, {
name: 'Gym',
price: 15,
type: 'Health'
}, {
name: 'Bills',
price: 100,
type: 'Household'
}
];

传统方式

1
2
3
4
5
6
7
8
9
var total = 0;

//other code goes here

for(var i=0; i<expenses.length; i++) {
total += expenses[i].price;
}

console.log(total);

很明显结果不会错,但是这中写法的缺陷:

  • 它依赖外部作用域中的变量 total,而这个变量有可能在其他代码中被覆盖,很难去追踪它的状态变化,不好预测
  • 如果有另一个需求也是求所用数组的属性和,那这个 for 循环又得写一遍

使用 Pure Function

1
2
3
4
5
6
7
function sum(arr) {
return arr.reduce(function(total, item) {
return total += item.price;
}, 0);
}

console.log(sum(expenses));

好处一目了然

Views

Pure Function 特征:

  1. 必须有返回值
  2. Same Input,Same Output

使用 Pure Function 的好处

  • 没有副作用,因为它不会改变它外部作用域中变量的状态
  • 容易单元测试,因为 Pure Function 不依赖外部作用域的变量,只需要关心输入和输出值
  • 使代码更佳简洁,更灵活,提高复用性

Pure Function in javascript

123…5
xwillmadeit

xwillmadeit

44 日志
48 标签
© 2017 xwillmadeit
由 Hexo 强力驱动
主题 - NexT.Muse